
.jpg)
I like snow and hot cocoa and sledding and snuggling up on bearskin rugs in front of a roaring fire with a hot toddy as much as the next person, don't get me wrong. (Actually, I'm not a huge fan of hot toddies or bearskin rugs... but you get the point.) Sometimes, however, there can be too much of a good thing. And this winter was way too much goodness. I was beginning to think that winter would never end!
Then the sun returned this week and it finally felt like spring! To celebrate the much-anticipated arrival of springtime I wanted to make a very sunny dress for my sunshine girl-- The Let the Sunshine In Dress.
This is a fairly straightforward dress with a zipper up the back and side pockets. I lined it because of the light colored fabric. But that is a personal choice. Would you like to know how to make one of your own? Follow this simple tutorial after the jump.

First, measure your girl and gather up all of your materials. I like to keep a notebook where I sketch out my ideas and write down measurements. It is easier than having a bunch of little scraps of paper lying all around. For this project, I bought 2 yards of yellow and white chevron cotton. That was more than enough. I probably could have gotten away with just one yard. I also used a 14" zipper, pink trim, pink satin ribbon and some plain white fabric I had lying around.
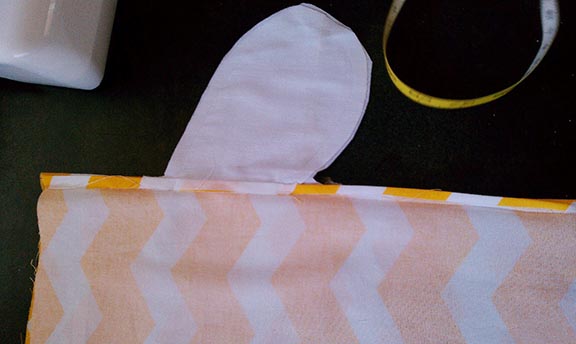
Miss Bloom measured 24" around under her armpits. I wanted a 10" long drop-waist bodice with a 13" skirt. I added a seam allowance and cut two pieces of fabric (one chevron and one white) 25" x 11". Pin your two pieces of fabric together, right sides facing. If you would like a trim at the top, sandwich that inbetween your two pieces, facing the outside fabric, along the top edge.

Sew along the two sides and the top, leaving the bottom open. Clip your corners and turn it right side out. Press and add a top stitch along the top. Your completed bodice piece should look like this. Please ignore the wrinkles.
 | |||||||
| Note: I added little loops for the waist sash to go through. |

34" white fabric for the skirt lining.

Attach your pockets to your skirt pieces. You should have one on each side of your 14" x 24" piece. Each 14" x 12" piece will have one on only one side. Make sure that they will all line up correctly.

Press them flat.

Now sew your three chevron skirt pieces together along the sides. For me, that would be the 14" sides. Line up your pocket pieces and sew along the outside of those too. But don't sew your pockets closed!
Press your seams flat. See the little pocket in there?
.jpg)
Now you have one long piece for the outside of your skirt, with a pocket along each seam. Sew a basting stitch (don't backstitch) along the top of your outside and lining skirt pieces with your machine set at the highest tension. This will cause your fabric to gather up along that edge. If your fabric is not gathered enough, pull gently on the thread from your basting stitch until your top edge is the same width as your bodice piece. Pin together your three pieces in this order: the bodice bottom edge right side up, outer skirt top edge right side down, and skirt lining top edge right side down.

Sew them together and press the seam flat. You should now have one piece that looks like this:

It's time to sew up the back hem and add the zipper. I was intimidated for a long time by zippers. It looks so complicated to do and you have to mess with something called a zipper foot. But the truth is that it is much easier than it looks. So much easier! Rather than reinventing the wheel, I am going to direct you to Sew, Mama, Sew! where they have a great tutorial for installing a beautiful zipper. Try it out and once you can install a zipper it will give you so many more options when crafting clothes.
At this point, you should be here, removing the zipper basting stitch and admiring your almost-finished dress.

This is also the point where I realized that I was burning daylight. And I needed to wrap things up if I wanted to take pictures of the finished dress before meeting my mom for margaritas and Mexican food (priorities).
So I made some simple straps using the much beloved "rectangles of fabric and safety pin method."

Attach the straps. Now all that is left to do is hem the bottom and tie on a sash.
 |
| Do you see that sunshine streaming in? Just try and stop that sun! |
Voila! All done!
Now you can throw your kid outside in the sun to play.


And saunter.

And pose.

And pose.

And one more pose for good measure.

The let the sunshine in dress!

No comments:
Post a Comment